How to Design & Build Fully Metal Turbofan Engine Kits?

How to Design & Build Fully Metal Turbofan Engine Kits?
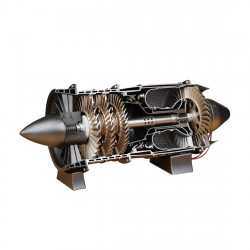
Designing and building metal turbofan engine kits has been an incredible adventure of challenges and creative fixes. Let me describe my own experiences:
Design Challenge:
Even though I was an expert in auto mechanics ten years ago, the world of airplane engines seemed unfamiliar. Going from internal combustion engines to jet propulsion wasn't very safe. Real engine diagrams and technical resources were complex to come by. It was a typical obstacle for many people like myself, which accounted for the market's lack of airplane engine kits. Thankfully, a fortuitous meeting with a professor from Beijing Aviation University introduced me to aviation expertise. I worked as his apprentice, gained practical experience, and slowly learned the ins and outs of airplane engines.
As I began designing and building this engine, I discovered that I needed to consider the four primary issues listed below, which may help clarify how challenging it is to create turbofan engine kits.
These kits required countless hours of patience to assemble because over a thousand screws needed to be connected. But during the second sample build, a new issue surfaced: a screw that had slipped into the internal engine was extremely difficult to remove without taking the entire kit apart. I suggest covering the holes during assembly using transparent tape to lessen this problem.
2. Tolerance Matters:
Every part of the engine needs to have precise tolerances. Manufacturing became more difficult due to a small 0.01mm inaccuracy in the first paint job, which resulted in a 2mm accumulation of errors in the finished product. Furthermore, owing to space constraints, we had to alter the kit's design from a real engine by reducing the number of compressor stages from 11 to 4.
3. Color Conundrum:
It wasn't easy to replicate the precise colours because the computer's graphics and manual tweaks didn't match. The answer may lie in industrial output.
4. Oil Pipe Problem:
Making a metal oil pipe was difficult because even minor hole mismatches needed to be redone several times.
In the quest to improve the kits, several updates were made:
- Performance was found to be improved by a stronger, faster motor.
- The external kit pieces' varying colours correspond to the materials found in real aircraft engines.
- A battery capacity 800mAh guarantees a runtime of 2.5-3 hours.
- A skilled builder can finish the kit in roughly 3.5 hours, but the ordinary individual may take up to 24 hours, including more than 10 hours for debugging.
- A manual switch provides backup power, and a switch valve mimics various engine noises.
- For stability, non-slip wheels were fitted to the bracket.
- For safety, tightened screws were used in place of the U-shaped groove design.
- To prevent disassembly, precise blade placement is essential.
Why do I 3D Print the Turbofan Engine kits at the beginning?
Unexpected obstacles prevented me from creating an accurate copy of the original turbofan engine. Making parts like the fan blades and crankshaft came at a far higher cost than expected. At first, I wanted an exterior contour that was 0.5 mm thick, but this was a difficult and expensive task.
After spending more than $10,000, which was more than I had planned to spend, I discovered that maintaining the project with complete metal components wasn't practical for my business. My team and I decided to use 3D printing for some of the external components to control expenses without sacrificing quality. Thanks to this change, we were able to blend price and authenticity.
After spending more than $10,000—more than I had budgeted for—I realized that keeping the project with entire metal components wasn't feasible for my company. My team and I used 3D printing for some of the external components to keep costs down without compromising quality elements. This adjustment allowed us to combine authenticity and price.
